THE SU PETROL PUMP
Well, I guess most of us have experienced the SU pump failing on a hot day due to petrol vaporisation. The problem is the position of the fuel pipe and pump beside the exhaust manifold and pipe and at a significant height above the level of the petrol tank. It is just designed to cause problems!The answer is to reposition the SU pump on the front LHS engine mount so that it is located away from the exhaust and low down to prevent vapour locks caused by sucking fuel uphill from the tank! Bend the fuel pipe down – it should just reach the front engine mount. Use a rubber fuel hose (designed for petrol) between the pump and the carby.
Alternatively, the problem can be cured by fitting a mechanical petrol pump. There should be a plate covering a hole on the LHS of the engine. Simply remove this and fit the plate.
AUDIBLE TURN INDICATOR
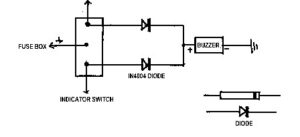
 Here is a hint for people without self cancelling indicators on how to wire an audible warning to the switch. All you need is a couple of diodes and a 12 volt buzzer which can be bought from an electronics store for a few dollars. The diagram shows the orientation of the diodes and how to wire the parts to the indicator switch.
HORNS
The Lucas horn is generally a reliable accessory; but if your horn doesn’t work or sounds like a flatulent cat then it is possible to repair it. But a word of warning – the horn is connected permanently ‘live’ to the wiring system – the horn switch earths the horn. The horn can be adjusted ‘in-situ’ but I found it easier to remove it from the car. Remove the cover and clean the contacts – they are sure to be badly pitted. Then undo the lock nut and adjust the contacts – the adjustment is fairly critical and seems to vary with the temperature of the contacts (beware – the contacts to get very hot!). So after adjusting the contacts to give a nice tone wait about 30 minutes for everything to cool and test it again. The horn can be adjusted in-situ but it is advisable to replace the top fuse with a heavy object such as a bolt to prevent the fuse being blown!! Good luck!!
SPEEDO CABLE
For owners of old MM or Series II Morries, it is possible to fit a complete speedo cable (inner and outer together) from a 1000 into your car.
If the outer case looks tatty, a piece of heat shrink of the right diameter and length will make it look like new. Just feed the case through the heat shrink, apply heat (a hair dryer is okay for this) and you have a ‘new’ looking cable to fool the judges at the next concourse!!
IGNITION TIMING
 One of the most unpleasant tasks in servicing a Morris Minor is checking the ignition timing. The timing pointer is located on the bottom of the timing cover and hidden by the radiator and front chassis member. If a timing light is used, a very long lead is required to reach under the car. Even worse, it is impossible to adjust the distributor whilst looking at the position of the notch on the pulley relative to the timing pointers.
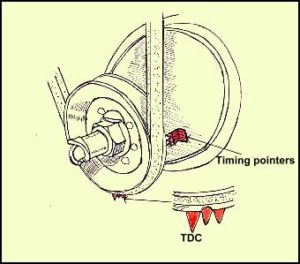
A solution to this dilemma is to make your own indicator and attach it to the L.H.S. of the timing cover beside the crankshaft pulley. A small piece of sheet steel from scrap galvanized iron or an old fruit tin can be cut into the required shape (copy the distance between the pointers on the original indicator), bent and glued onto the timing cover with a quick hardening epoxy glue (see the diagram). Line the pulley notch with the TDC pointer (of the original indicator at the bottom of the timing cover) and then mark the pulley with a daub of white paint or correction fluid in line with the first pointer on the DIY pointer. It is then a very simple matter to point the timing light at the DIY indicator from above the engine. You should also be able to turn the distributor whilst looking at the position of the timing pointers (it is easier to loosen the distributor clamp and turn the unit than fiddle with the micrometer).
The above ignition timing pointers sourced from Morris Minor Car Club of Victoria Inc


